
Are you finding it difficult to install WordPress while using your local server? If YES! then here is a great opportunity for you to install WordPress using a local server on your device with ease and less stress.
Installing WordPress on a window or Mac computer is often the first step to take in building any WordPress website. To install WordPress you need to get started by installing a local server app.

This article covers the following:
- Getting started with WordPress.
- How to download and install a local server.
- How to download WordPress.
- How to install WordPress using your local server.
- List of the best websites to buy your domain name.
- Essential tips to speed up your WordPress website.
Getting Started With WordPress
One of the amazing things about WordPress development is that it can set your environment anywhere anytime you like and writing WordPress hooks rather than fiddling with environment variables.
WordPress is an open-source platform everyone can use thereby the entry barrier is very low. WordPress is supported by any hosting solution you can think about from a shared server to a fully managed WordPress such as cloud ways where you can launch a fully-fledged WordPress in one click. You can select a hosting solution based on your budget and expertise.
The importance of a locally hosting website is because it is faster affording you the opportunity to quickly test plug-ins and themes. It minimizes downtime; it saves time and provides flexibility. The local website is only visible to you on your computer. You can also try as many WordPress themes and plug-in and test their features.
Now let’s get started on how to download and install a local server.
How to Download and Install a Local Server
A local server is a computer that serves a client within a local area network. A local webserver holds web-based applications only for the local organization. It can also act as a file server.
The most popular localhost servers include:
- WAMP for Mac.
- XAMPP OR WAMP for PCs
- LAMP.
These are the software that creates localhost on your computer by utilizing web server software PHP, Apache, MySQL, and Perl.
Below here are guidelines on how to download and install WordPress locally using XAMPP.
How to Download and Install XAMPP
XAMPP is an acronym for the X platform, Apache, MySQL, Perl, and PHP. XAMPP is free to use and easy to use and install. For WordPress to work effectively certain things need to be considered such as the webserver app, the server-side programming language like PHP, and database management like MySQL.
XAMPP is better than WAMP because of its compatibility with the available operating system like Linux, windows; OS -X. WAMP is limited only to Windows operating system.
How to Download a XAMPP
You are to follow the steps below to download your XAMPP local server for free.
- To download XAMPP on your device visit the official website to download the latest version.
- Select the version for your operating system and click the download button.
- Wait for a few seconds while the XAMPP is downloaded on your device.

Now to are done downloading the XAMPP on your device and the question on your mind is how do I install the XAMPP on my device? You have to worry less because we got you covered from the beginning to the end of How to Install WordPress Using a Local Server.
How to Install a XAMPP
After downloading the software, you will need to run it on your pc.
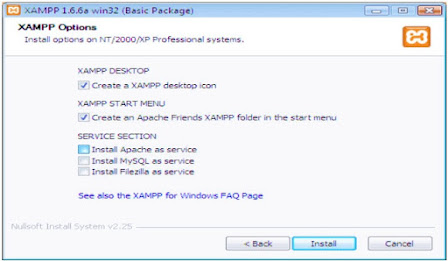
- During the installation process, a warning may pop up. Click "Yes" to start the installation process. Soon after you click on the download file, the XAMPP setup wizard opens. Now click on "Next" to proceed. In the next step, some checkboxes with options that are already marked will appear. You only need PHPMyAdmin, MySQL, and Apache.

- Choose a folder where you want to install the software. You can choose the default location and click next to proceed.

- If you have any antivirus software on your computer, you may see a security alert. Don’t panic, check any of the given networks, and click the "Allow access" button.

- Now you will see a window showing information about bitnami. Click next.

- You will see another message setup is now ready to install XAMPP on your computer. Just click the install button to proceed.
- Once the installation is completed, you will be asked whether you would want to start the control panel now or not. Check the box and click on the finish button. If the entire installation processes went correctly, then the control panel would run smoothly.

- Now click the start button corresponding to apache and MySQL. The color of the apache and MySQL turn green automatically. Once the apache and MySQL server launch, XAMPP will automatically open the web start page in your browser.


You've successfully downloaded and installed the XAMPP on your device, so the next step to take is for you to download WordPress. In a few minutes, the downloading process will be over only if you follow the instruction given below.
How to Download WordPress
This section of the article covers WordPress installation on windows. After setting up the webserver and database. Download WordPress from their official website.
Note: Ensure that the apache and MySQL service in the XAMPP control panel is running. Without starting both of them, it won’t get access to PHPMyAdmin.
- Visit the "PHPMyAdmin" portal to create the database of your new site.
Steps:
- Go to WordPress's official website @ https://wordpress.org.
- Download and extract the WordPress package.
- Create the database.
- Upload the files
- Run the install script.
- After downloading WordPress, you need to extract the zip file. You will see a WordPress folder. You need to copy the folder.
- Go to the XAMPP installation folder. Paste the WordPress files you copied earlier inside the htdocs folder.
- Move the zip file to the subfolder htdocs folder in the XAMPP directory. In the docs, create a new folder for your test site. The folder name will become the sub name to access the site. For instance, if the folder name is my site, you will access your site by going to (http://localhost/mysite).

- Next, you need to open your browser and visit localhost/WordPress.

Creating a Database
Open a new browser tab and visit localhost/phpmyadmin/. This will automatically launch the phpMyAdmin app that comes pre-installed with XAMPP.
Creating a database, you need to create a folder on your computer in which you will save all the data of your local site as shown above.
- Go to your local disk where you saved the downloaded the xampp files.
- Select the htdocs folder and paste the WordPress version you have copied earlier.
- Open a new tab on your browser and go to localhost/phpmyadmin.
- Select the database. Write a name the same as the one written on your local disk.
- Click on the create button.

WordPress will require the following:
- A database name.
- Username.
- Password.
- A database host.
- Click on the submit button.
- WordPress will now store these settings to your WordPress configuration file called wp-config.php file
Note: Provide your database name, you can write root as your username, keep the password option blank. You might decide to set it later on.

You will need to create this file in your website root folder. After creating the file, paste the text you copied earlier inside it. Save the file and return back to the WordPress installer to continue. In the next step, WordPress will require:
- Name of your website.
- Write your email address for your admin account.
- Finally, click on the install WordPress button.
- After that, click on the login button to log in to your admin login page for your WordPress site.

Once you complete the process, you will see a brand new WordPress with a theme running perfectly on your localhost. Unlike installing WordPress on a live server, when you install XAMPP and WordPress, you don’t need to worry about creating a database user for your site.

List Of The Best Sites To Buy a Domine Name
- Wix.
- Godaddy.
- Dreamhost.
- Wordpress.com.
- Jimdo.
- Hostgator.
- Site 123
- Bluehost.
- Network solution
- Squarespace
- Zyro
Essential Tips To Speed Up Your WordPress Site
It isn’t about creating a site to boost your business; it’s about how we tend to manage our WordPress site. Below are the lists on how to speed up the performances of your WordPress site.
- Choose a good hosting plan: If your site is unreliable, it doesn’t matter how fast it performs or how beautiful it is designed. Play your part and check out some user's reviews for hosting companies. Ensure you regularly track your site traffic volume and resource usage to know when you can upgrade to a better hosting plan before your visitors start noticing your site as being slow.
- Digging deeper: Ensure to run a series of tests on your site to identify performance issues and direct you on how to correct them.
- Enabling caching plug-ins: Caching simply means the storing of data in a temporary storage file. This helps improve the performance of the site since there’s a lot of pages content available and doesn’t need to be fetched. This reduces a load of system resources on the server. We recommend you use the caching plug-ins provided by the Bluehost, which is built to work best on any environment. Note: If your site is not a WordPress site, enabling caching can be complex.
- Use a CDN (content delivery network). A CDN is a worldwide network of servers that allows you to duplicate and store your site static files such as JavaScript, images, documents, videos, CSS, etc.
- Optimize your images: The size of your site images can be an issue for page speed. Also, reduce the number of posts on the page. Most images can be resized without a web user noticing any reduction in quality either by using graphic editing tools or plug-ins.
- Get rid of HTML, CSS, or JavaScript: This basically means getting rid of comments, extra line breaks, and spaces in the code in order to make the code lighter in size and reduce the amount of data that needs to be transferred thereby reducing the time it takes to load a page.
- Optimize database: It is also important to delete fake users, old drafts content, spam, and unwanted theme. All of these will reduce the size of your database and web files and thus speeding up your WordPress site and keeping your database size to a minimum.
- Deactivate plug-ins: Keeping unwanted plug-ins can affect your web files and increase the size of backup putting a lot of the load on your server resources. Also, disable hotlinking and leeching of your web content.
Thanks for reading! Please share the post if you enjoyed it.


No comments:
Post a Comment